Painting an abstract self-portrait might seem like a massive undertaking, especially if you’re a beginner. Portraits are a skill in and of themselves, and abstraction requires a lot of experience to do right – if done wrong, the results can range from hilarious to disastrous.
Don’t worry, though, because help is at hand. Developments in photo editing technology mean it’s easier than ever to shape and refine your photographs.
This article will take you through the steps first to transforming a photo into abstract art, and then turning it into a beautiful paint by numbers that’ll ensure a flawless end result.
Getting started
The whole process won’t take too long, but nevertheless it’s good to be prepared before you start. Using a laptop or desktop computer is best – mobile phones can be fiddly and you’ll want to see what you’re doing on a big screen.
Make sure you’ve got the brightness of the screen at a high level so you can see all the details of your image, and if you’ve got a blue light filter on (some laptops apply this automatically in low light – it gives the screen an orange tint so it’s easier on your eyes), turn it off so that you can see the correct colours of the photo whilst you’re editing it.
Choosing the right picture
When choosing your photo, make sure it’s good quality so that when you come to expand and transform it into a paint-by-numbers, the details will be well defined. Ideally, your image should be 300dpi (dots per inch – it’s sometimes listed under the ‘info’ button when you open your photo) but if you’re not sure, zoom in on your image using the + icon somewhere on the page.
If you can zoom in at least halfway before you see any pixels, it’s probably a good quality image.
It’s also a good idea to choose something relatively simple, especially if you’re a beginner; a complex background can result in a confusing painting, and more than three subjects might mean you can’t capture the details of an individual’s features.
Advantages of this technique over asking a professional artist to paint it for you
You might think, why not ask a professional artist to do this for me? And, sure, there’s plenty of very talented artists out there who would love a commission from you.
However, if you’re looking to further your skills, this process is a useful one to get familiar with. Painting and photography are intrinsically linked art forms, and if you know how to edit and transform photos, you’ll develop not only computer skills but also an artistic eye that’s integral to constructing a beautiful portrait paint by numbers.
Last but not least, the finished portrait will be painted by your own hand – you can’t get more bespoke than that.
Portraits ideas
When deciding what to paint, it’s important to consider your own skill level. A self-portrait or a portrait of a loved one is easier than say, a family photo.
If you're looking for a pet paint by numbers, bear in mind that this will pose different challenges such as capturing the texture of fur.
If you’ve a bit more experience, you might choose a longer shot of a few friends or family members, or that rare moment when all the family pets have managed to hold a pose.
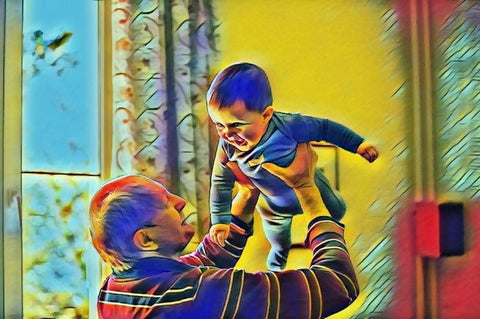
You could even opt for your favourite TV star or movie character and create your own hand-painted homage (just make sure you find a high-quality image online). I’m using this gorgeous photo:

It'll result in a painting that’s a little trickier due to the multiple subjects, the angle at which their bodies are and the natural light source in the background – these are all things to consider when choosing your own photo.
No portraits are particularly easy to paint, but if you’re a complete beginner, a straight-on portrait of a single person with balanced lighting is probably best for you.
Turn your photo into an abstract artwork
Now that you've chosen your picture, let's dive in!
1. Go to https://www2.lunapic.com/editor/
2. Click “Upload” and choose the picture you’d like to edit from your computer files:

3. Click the “Art” tool on the toolbar above the image:

4. From the drop-down menu, select the effect you’d like to apply:

Example: I’ve always loved Van Gogh, so I’m going to apply the “Van Gogh” effect.

5. Adjust the strength of the effect using the sliding tool above the image and click “apply”.
Example: The “Van Gogh” effect is a little garish for me, so I’m going to lower the strength of the effect by about two thirds:

6. If you’d like to try a different effect, click “Undo this effect” above the image, otherwise, the new effect will apply over the top of the old one.
7. To browse effects, click Art > Famous Art Works:

Example: I like the colours and painterly texture of the “Dreaming” filter, so I’ve applied it and lowered the strength so it’s not quite so bold:

The “Psychedelic” effect gives some lovely spiraling shapes, although I’ve toned it down a bit to retain some of the details of the original photo:

The “Nouveau” effect gives a unique and beautiful mosaic texture:

And the “Candy” filter gives softer, more natural shapes and smoothly blended colours.
I’ve kept it at 100% because I like the boldness of it, but if you’re looking for something more subdued, you can reduce the strength:

8. Finally, download the photo by clicking File > Save Image > Save as JPG. Remember to name it something you’ll be able to find later, or it’ll save as a string of numbers and letters.
In order for your newly edited photo to become a physical painting, you can convert it into an abstract paint by numbers template. Paint by numbers is a brilliant way to hone your painting skills whilst avoiding the stress of trying to replicate your photo via eye alone.
The kits use acrylic paint, the perfect medium for beginners and with its rich, vibrant tones you’ll be able to capture your abstract photo in all its technicolor glory.
How to turn your photo into a unique paint-by-numbers
Now that you've turned your picture into a wonderful abstract artwork, let's see how you can easily transform it into a paint by numbers.
1. Go to https://winniespicks.com/products/custom-photo-paint-by-numbers
2. Choose your canvas size:

When deciding on the size, consider where you’re going to hang your finished painting – the 12x16in might look lovely on a busy wall with other photographs and artwork but will look a little lonely on a big blank wall of its own.
The 24x36in, on the other hand, is a standard film poster size and might crowd a smaller space, but will fill a lounge wall easily. You should also consider your ability – a larger paint by numbers might appear to take more time, but it will be far easier to capture fine details on a large canvas.
Smaller canvases will require more concentration in order to get those intricacies just right. If your photo is already square or has lots of empty space around the main subject, you might opt for the 16x16in to cut out some of the blank areas.
3. Upload your file by clicking “Choose File” and selecting your edited image.
You’ll be able to adjust your image during this process to make sure you get the best quality paint by numbers, and then all that’s left to do is place your order!
Do not hesitate to contact us if you have any questions regarding the tutorial or your order. We'll be happy to help!
More examples
Here are some examples of the gorgeous painting styles you could create using this process.
Here’s the image I created above using the ‘Candy’ effect:

Paint by Numbers result:
As you can see, the paint-by-numbers is able to capture every vibrant colour in the original picture. It also emphasizes the lovely spiraled texture created by the filter.
Painting something like this is a great way to get to know acrylic as a medium, from the richness of the colour to the steady hand required to paint those pure white highlights.
Here’s the same image created with the “K2” filter:

Paint by Numbers result:
This is great if you’d like a bright painting with less contrast than the “Candy” filter. The paint by numbers easily captures the fine detail of the creases in the grandpa’s clothes, the hair on both their heads and the pattern on the curtain in the background.
Due to these intricacies, a painting like this is a little more advanced than the previous style, so take this into account when you’re choosing your effect.
This one uses the “Smoke” effect:

Paint by numbers result:
It is perfect if you’d like something a little more subdued to go on the wall. Black and white photos are always a lovely addition to a room, and the acrylic paint you’ll use for the paint by numbers is perfect for capturing that rich, glossy black and the spectrum of grey tones in the image.
Last but not least: the “Polygon” effect:

Paint by numbers preview:
This last one is perhaps my favourite – you might overlook the “Polygon” effect at first, but I love this style, and when transformed into a paint-by-numbers, the painterly quality of it really shines through.
The colours remind me of an early evening sunset and also give the picture an aged quality as if it could hang alongside the work of the old masters. The process of painting something like this will give you a great sense of the more impressionistic and even slightly cubist styles of artwork.
That's it for today! It's now your turn to play with this tool and to immortalize your favourite pictures into unique abstract paintings!


